| Battle of Hastings 1066AD - A1 - Three Fleets, One Weather System |
|---|
| |
|---|
The September Storm - Both Fleets, One Weather System |
|---|
| Introduction ▲ |
|---|
|
The storm that struck William’s fleet as it left Dives-sur-Mer in September 1066 is documented on
page D —
Sailing, Dives sur Mer to St Valerie. That page establishes that the Norman fleet lost approximately
83 ships on the coastal run to St Valérie, that William suppressed news of the casualties, and that
the storm involved a counter-clockwise low pressure system tracking up the Channel.
This page proposes a wider meteorological model. The storm was not an isolated event. It was one
component of a larger, persistent atmospheric pattern — an Omega block — that
governed the entire campaign of September 1066.
That single pattern simultaneously:
- Guided Harald Hardrada’s fleet south from Norway to Yorkshire with following winds
- Trapped William’s fleet at Dives with persistent contrary winds for weeks
- Generated the counter-clockwise low that damaged both Harold’s and William’s fleets
in mid-September — from opposite sides of the same 25 miles of water
- Finally collapsed to produce the light southerly that carried William across on 27–28 September
Three invasions. Three fleets. One weather pattern. One outcome — the Norman Conquest of England.
This is a theoretical model. It has been submitted to the Met Office National Meteorological
Library for expert review. Comments from meteorologists or maritime historians are welcomed via the
contact page.
| | |
|---|
The Omega Block — The Master Pattern ▲ |
|---|
|
An Omega block is a well-documented atmospheric configuration in which the jet stream splits around a
slow-moving or stationary high pressure ridge, with a low pressure system on each side. The pattern
takes its name from its resemblance to the Greek letter Ω. In the North Atlantic and European
region it can persist for days or weeks, fundamentally altering weather patterns across a large area.
The model proposed here places an Omega block over the British Isles and adjacent seas in August and
September 1066, configured as follows:
- Low 1 — a counter-clockwise low centred over or near the northern North Sea,
approximately in the region of Edinburgh or southern Norway
- High ridge — a slow-moving area of high pressure trapped between the two lows,
centred over central or southern England
- Low 2 — a counter-clockwise low developing in or tracking up the English Channel
Each component of this pattern affected the three fleets differently — determined entirely by
their position relative to the system.
| Component |
Fleet affected |
Position relative to component |
Wind produced |
Observed result |
| Low 1 (northern North Sea) |
Hardrada (Norse) |
Western flank of Low 1 |
Easterly then northerly — directly behind his sails |
Fast passage from Norway via Shetland and Orkney to Yorkshire |
| High ridge (central England) |
William (Norman) |
South of the high; high acts as northern wall of Channel |
High deflects Atlantic lows into Channel funnel, producing repeated westerlies and south-westerlies along Norman coast |
Trapped at Dives for weeks by procession of funnelled Channel lows. No single contrary wind — a repeating pattern. |
| Low 2 (English Channel) |
Harold (English) and William (Norman) |
Harold on northern side; William on southern side |
South-easterly on English coast; north-westerly on French coast — simultaneously |
Both fleets damaged in mid-September. Two sources, one storm. |
| Block collapses; high drifts NE to Denmark |
William (Norman) |
Now south of the displaced high |
Light southerly at St Valérie |
William crosses 27–28 September in ideal conditions |
| | |
|---|
Low 1 — Hardrada’s Wind ▲ |
|---|
|
Harald Hardrada assembled his fleet at Solund in the Sognefjord, Norway, and departed in early August
1066 with approximately 300 longships. His route took him west to Shetland, south to Orkney where he
collected the Jarls Paul and Erlend Thorfinnsson and additional forces, then south down the east coast
of Scotland and England to the Humber, and finally up the Ouse toward York.
This route requires explanation. The initial westward leg from Norway to Shetland requires an
easterly wind. A simple blocking high over northern England would not produce this —
it would produce southerlies on the eastern flank, which would be useless or contrary for a
westward passage. However, a counter-clockwise low centred over the northern North Sea or near
Edinburgh would produce exactly the easterly needed on its southern flank, shifting to a northerly
on its western flank as Hardrada turned south from Orkney.
This is the critical meteorological observation: Hardrada’s route implies Low 1, not a simple
high. The low gave him the easterly for the Norway-to-Shetland leg, then the northerly
for the Orkney-to-Yorkshire leg — following winds throughout.
| Route segment |
Direction of travel |
Wind required |
Produced by |
Historical speed |
| Solund (Norway) to Shetland |
West |
Easterly |
Southern flank of Low 1 |
c.10 days (est.) |
| Shetland to Orkney |
South-west |
North-easterly |
Western flank of Low 1 developing |
c.5–7 days (est.) |
| Orkney south down Scottish coast |
South |
Northerly — directly following |
Western flank of Low 1 |
Fast — square sails filled |
| Tynemouth to Scarborough to Holderness |
South |
Northerly — following |
Western flank of Low 1 |
c.200 miles in 5–6 days |
| Into the Humber estuary |
West (turning inland) |
Beam wind |
Transition zone |
Tacking up estuary |
The historical record confirms Hardrada’s remarkable speed. John of Worcester places him at Tynemouth
on 8 September. Orderic Vitalis places the fleet at the Humber on 18 September. Scarborough was burned
around 16 September. The fleet reached Riccall (8 miles south of York) around 18–19 September, and
fought the Battle of Fulford on 20 September. This rate of progress is consistent with persistent
following winds throughout the coastal passage.
| | |
|---|
The Trapped High — William’s Prison ▲ |
|---|
|
Between the two lows, the Omega block configuration traps a high pressure ridge over central England.
It is important to understand that William was not simply sitting under calm, light winds beneath
this high. The high itself was not the direct cause of his difficulties. It was what the high
did to the Channel that imprisoned him.
The high over central England acts as a wall along the northern side of the English Channel.
Atlantic low pressure systems — which would normally track north-east across the British Isles —
are deflected by this wall and instead find the path of least resistance: eastward along the Channel
corridor itself. The gap between the blocking high to the north and any low pressure to the south
creates a natural funnel, and small depressions are squeezed through it one after another, each
producing westerly or south-westerly winds along the Norman coast.
For William at Dives, the result was a procession of small Channel lows, each
arriving from the west and driving conditions that made a northward crossing to England impossible.
A fleet of 700 vessels cannot beat west or north-west into a sustained westerly, nor can it safely
cross a Channel running with steep westerly seas. Each time conditions eased briefly, another
depression was funnelled through before William could act.
This mechanism explains several features of the historical record that a simple northerly headwind
does not:
- The extreme length of the wait — weeks, not days. A single unfavourable wind
direction might persist for days and then shift. A procession of funnelled lows arriving
repeatedly from the same direction is a fundamentally different problem, and one that cannot
be predicted or planned around from the beach at Dives.
- Why William moved to St Valérie rather than waiting at Dives — Dives is
directly exposed to westerly funnelling along the Channel. St Valérie, in the sheltered Somme
estuary set back behind the Normandy/Picardy headlands, offers considerably more protection from
Channel westerlies. Moving there was not simply about a better departure angle — it was about
finding a harbour that gave the fleet some shelter from the repeated Channel lows.
- Why his departure on 12 September was into deteriorating conditions — William
moved in what appeared to be a brief window between two of these funnelled systems, only to be
caught by the next one as it entered the Channel behind him. The fleet was still strung out along
the Normandy coast when Low 2 arrived.
It also explains why William prayed publicly at St Valérie for a change in the wind and granted a
charter to the church there in thanks when it finally came. He would have understood, as any
experienced medieval sailor would, that the wind had been against him in a way that went beyond
ordinary bad luck. Something large and persistent was funnelling conditions against him, and only
a fundamental change in the large-scale pattern would end it.
| | |
|---|
Low 2 — The Channel Storm ▲ |
|---|
|
As the Omega block began to weaken in early to mid September, Atlantic low pressure systems —
previously deflected north by the block — began to find a route into the Channel. The configuration
proposed here places Low 2 tracking along or up the English Channel around 12–13 September.
A counter-clockwise low in the Channel produces winds that rotate around its centre. The critical
observation is that the same low produces opposite wind directions simultaneously on opposite
sides of the Channel:
- On the French (Norman) coast — north-western side of the low: North-westerly
winds, driving vessels east along the Normandy coast and onto the Alabaster Coast cliffs between
Dieppe and Le Tréport
- On the English coast — northern side of the low: South-easterly winds, driving
vessels onto a lee shore as they approached the Thames estuary from the west
The Channel is approximately 25 miles wide at the Strait of Dover. Both effects occur simultaneously,
25 miles apart, from the same rotating system. This is not two separate storms recorded in two separate
sources. It is one storm, recorded from two different sides by chroniclers who had no knowledge of
each other’s observations.
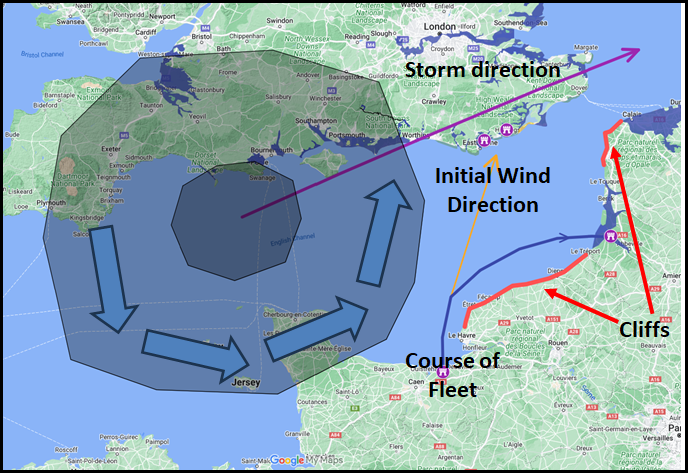
The storm map on page D shows the counter-clockwise rotation and its effect on the Norman
fleet along the Alabaster Coast. Harold’s fleet was simultaneously on the opposite side of the same
system, experiencing south-easterly conditions in the Strait and Thames approaches.
The collapse of the Omega block may itself have intensified Low 2. As the trapped high began to weaken,
the sharp contrast between the stable air it had maintained over England and the incoming Atlantic air
from the west would have steepened pressure gradients and potentially deepened any developing low,
producing a more sudden and damaging storm than would otherwise have occurred.
| | |
|---|
Harold’s Fleet — The English Side of the Storm ▲ |
|---|
|
Harold had maintained a fleet watching the Channel from the Isle of Wight throughout the summer of 1066.
The Anglo-Saxon Chronicle records that the fleet was stood down on 8 September — the Nativity of
St Mary. Supplies were exhausted and the men could not be held any longer. The fleet was ordered back
to London.
There is only one Chronicle reference to losses on this passage, so it is not corroborated
and is shown in red:
The Anglo-Saxon Chronicle (manuscript C) records: ‘the ships were driven to London; but many
perished ere they came thither.’ Harold’s fleet suffered losses and damage on the return voyage
from the Isle of Wight to London. Ships were wrecked and men were drowned.
The route from the Isle of Wight to London covers approximately 200 to 250 miles: east along the
Sussex coast past Beachy Head and the Seven Sisters, through the Strait of Dover, around the North
Foreland, and south-west into the Thames estuary. At typical sailing speeds of 3 to 5 knots this
passage takes three to five days for a large fleet.
Leaving around 8 September, Harold’s fleet would have been in the region of the Dover Strait on
approximately 10 to 12 September — within 20 to 30 miles of the French coast. This is
precisely the moment William’s fleet was leaving Dives.
Harold’s decision to stand down the fleet on 8 September has often been criticised as premature or
misjudged. But the same blocking pattern that had kept William trapped in Normandy all summer was
also making conditions in the Channel difficult and unpredictable. Harold’s commanders may have had
good practical reasons to move the fleet before conditions deteriorated further — and the fleet
sailed directly into the developing storm.
The fleet's most probable route was not a single unbroken passage from the Isle of Wight to London. The natural staging pattern for a large fleet working east along the Sussex coast would have been an overnight stop at Pevensey on the 8th — Godwin family territory and a known fleet anchorage — before continuing northeast toward Sandwich on the 9th. Sandwich was the principal royal fleet base in Kent, the natural destination for a fleet standing down from active watch. The fleet would not have stopped at Hastings, despite it lying on the route: Hastings was Fécamp Abbey territory, economically tied to Normandy for fifty years, and had attacked Harold's brother Swein in 1049. It was not a safe anchorage for a Saxon fleet.
Leaving Pevensey on the morning of the 9th, the fleet would have been passing the Hastings coast by mid-morning and approaching Dungeness by afternoon. The dangerous stretch began east of Dungeness: from Folkestone to Deal the coast offers vertical chalk cliffs, no shelter, no beach, and powerful tidal streams through the Strait. In a northwesterly, this is a dead lee shore with no sea room to claw off. The smaller, lighter vessels in the fleet — unable to make sufficient speed to stay off the cliffs — would have been lost in this stretch. The larger ships punched through and reached Sandwich. This mirrors precisely what happened on the Norman side of the same storm: the faster oared vessels made Saint-Valery, the slower ships were wrecked on the Alabaster Coast.
There is one further detail that the timing of William's departure may illuminate. Harold stood down his fleet on 8 September. Within a day or two, William moved from Dives — a proximity that has never been satisfactorily explained by wind conditions alone. Hastings almost certainly had vessels present with Harold's fleet on the Isle of Wight, furnished as part of the same ship-service obligation that the Anglo-Saxon Chronicle records Godwin collecting from the same ports in 1052. When the fleet dispersed on the 8th and headed east toward Pevensey, a single Hastings vessel crossing south rather than east would have been unremarkable in the general movement. The crossing from the Isle of Wight to the Normandy coast is some eighty miles, achievable within a day. If such a vessel reached Dives on the 8th or 9th carrying word that Harold could no longer hold his fleet together, it would explain what the meteorological model alone cannot: why William chose that precise moment to move. The storm caught both fleets because William sailed the moment he received intelligence that Harold had stood down — and sailed directly into the same depression that was overtaking the Saxon fleet from behind.
| | |
|---|
William’s Fleet — The Norman Side of the Storm ▲ |
|---|
|
William left Dives-sur-Mer on approximately 12 September 1066, heading north-east for
St Valérie-sur-Somme — a coastal passage of around 150 miles. The fleet had been waiting since
early August for a favourable wind. The trapped high of the Omega block had denied him that wind
for weeks. When he finally moved, it was into the deteriorating conditions of Low 2 developing in
the Channel.
There is only one Chronicle source for this passage, so it is not corroborated and is shown in red:
William of Poitiers, Gesta Guillelmi: ‘Presently the whole fleet, equipped with great
foresight, was blown from the mouth of the Dives and the neighbouring ports, where they had waited
for a south wind to carry them across, and was driven by the breath of the west wind to moorings at
Saint-Valéry. There too the leader...concealed (as far as he could) the loss of those who had drowned,
by burying them in secret; and by daily increasing supplies he alleviated want.’
As documented on page D,
the discrepancy between the Dives ship list (777 vessels) and Master Wace’s figure for St Valérie
(694 ships) implies approximately 83 ships were lost — over 10% of the fleet. The losses were
predominantly among the slower, non-oared transport and supply vessels. The faster oared warships
carrying troops made St Valérie. This left William with most of his army intact but critically short
of food, fodder and equipment.
William’s wait at St Valérie was therefore not simply a wait for a favourable wind. It was also a
wait for replacement supplies to be gathered from the surrounding area. He needed both before he
could sail.
| | |
|---|
Three Fleets, One Pattern ▲ |
|---|
|
Position relative to the Omega block determined outcome. Each fleet sat in a different part of the same pattern, and each pattern component produced a different, opposite effect — following winds for one fleet, imprisonment for another, simultaneous damage for the remaining two.
| Fleet |
Position |
Effect of pattern |
Result |
| Hardrada (Norse) — c.300 longships |
Western flank of Low 1, North Sea |
Easterly then northerly following winds throughout |
Fast passage from Norway to Yorkshire. Arrived Tynemouth 8 Sept; Humber 18 Sept. |
| Harold (English) — c.700 ships |
Northern side of Low 2, English Channel |
South-easterly storm damage on return to London |
Fleet damaged and weakened. ‘Many perished ere they came thither.’ (ASC-C) |
| William (Norman) — c.700 ships |
South of trapped high; high funnelling lows along Channel |
Repeated westerlies and south-westerlies from procession of Channel lows. Finally caught by Low 2 en route to St Valérie. |
Trapped at Dives by repeated funnelled lows. 83 ships lost on Alabaster Coast when Low 2 arrived. Supply crisis at St Valérie. |
The connection between Harold's losses and William's losses has never previously been made in the historical literature. Norman chroniclers wrote about William's campaign. Saxon chroniclers wrote about Harold's. Neither had reason — or possibly knowledge — to connect the two events. The Norman sources actively suppressed the storm damage. The link has therefore remained invisible for nearly a thousand years, simply because no one was reading both sets of sources simultaneously and asking whether the weather connecting them was the same weather.
But the pattern runs wider than the Channel storm alone. Hardrada's speed in the north, William's weeks of imprisonment at Dives, and the simultaneous mid-September damage to both English and Norman fleets are not three coincidences that happened to share a month. They are three readings of one system, taken from three different positions around it — the same Omega block that would finally collapse on 27 September to hand William his crossing.
| | |
|---|
The Collapse — William’s Southerly Wind ▲ |
|---|
|
For William to receive a southerly wind at St Valérie-sur-Somme, the following sequence is required:
- Low 2 exits the Channel eastward, tracking into Belgium or the southern North Sea
- The trapped high migrates north or north-east behind the departing low — moving toward Denmark
or southern Scandinavia
- With the high now to the north or north-east of St Valérie, the clockwise circulation of the
high produces a southerly at that location
This migration of the high north-east toward Scandinavia is consistent with the known behaviour of
Omega blocks as they collapse. The jet stream’s seasonal southward shift in late September — as
autumn establishes itself in the North Atlantic — is a plausible trigger for the breakdown of the
block and the north-eastward displacement of the trapped high.
Crucially, the wind that gave William his crossing was light — historians estimate
Force 2 to 3. This is consistent with the slack pressure gradient of a high that has recently moved
into position. Heavy winds would have endangered the horse transports on which William’s cavalry
depended. The weather did not merely allow William to cross — it gave him precisely the conditions
he needed.
William of Poitiers confirms the wind shifted on 27 September and the fleet sailed immediately.
The crossing was made overnight and the fleet landed at Pevensey on 28 September 1066.
| | |
|---|
Prof Licence and the Sea Voyage Theory ▲ |
|---|
|
In 2026, Professor Tom Licence of the University of East Anglia published research arguing that
Harold’s famous 200-mile march from York to Hastings never happened — that Harold returned from
Stamford Bridge largely by sea, using the fleet gathered at the Humber, which by that point included
approximately 300 vessels captured from Hardrada’s Norse army at Stamford Bridge.
Prof Licence argues that the Anglo-Saxon Chronicle phrase describing Harold’s ships as having
“come home” was misread by Victorian historians as a disbanding of the fleet. He contends the ships
remained operational throughout, were used against Hardrada in the north, and were then used for
Harold’s return south and a planned naval blocking action against William.
This is an important revision. However the meteorological model raises a problem that Prof Licence
does not address.
If the Omega block collapsed in late September to produce the southerly that carried William across
on 27–28 September, then Harold sailing south from the Humber at the same time would have been
heading directly into that same southerly — against the wind that was filling
William’s sails. The captured Norse ships, though capable open-water vessels, would have been rowing
or tacking into contrary winds with exhausted crews on a 300-mile passage down the North Sea and
around the Kent coast.
Prof Licence’s own evidence shows the English fleet arrived too late. The meteorological model may
provide the missing explanation: Harold’s sophisticated naval strategy was undone by the same
weather system that gave William his crossing.
There is a narrow exception. If Harold had sailed immediately after Stamford Bridge on 25 September —
into the dying northerly tail of the block, before the wind finally shifted southerly on 27 September
— he might have had a following wind south for one or two days. It was a window of perhaps 48 hours.
He appears to have missed it.
| | |
|---|
The Reconstructed Timeline ▲ |
|---|
| Date |
Weather pattern |
Harold / English fleet |
William / Norman fleet |
Hardrada / Norse fleet |
| Early Aug |
Omega block established. Low 1 over northern North Sea. High over central England. Low 2 developing. |
Fleet on watch at Isle of Wight. Supplies running low. |
Fleet assembled at Dives. Persistent northerly preventing crossing. |
Departs Solund, Norway c.1 Aug. Arrives Shetland c.10–16 Aug. |
| c.20 Aug |
Block persisting. Northerlies in Channel. Northerlies in North Sea. |
Fleet watching south coast. |
Still at Dives. 777 ships per ship list. |
At Orkney. Collects Jarls Paul and Erlend. Leaves wife and daughters. |
| c.1 Sept |
Block beginning to weaken. |
Supplies nearly exhausted. |
Still at Dives. |
At Dunfermline, Scotland. Meets Malcolm III. Gains c.2,000 Scottish troops. |
| 8 Sept |
Conditions deteriorating. Low 2 developing in western Channel. |
Fleet stood down. ‘It was now the nativity of St Mary.’ (ASC-C) Ships depart for London. Harold rides to London. |
Still at Dives. Preparing to move. |
Hardrada and Tostig meet at Tynemouth with c.300 ships. (John of Worcester) |
| c.10–11 Sept |
Low 2 entering Channel. Storm building. |
Fleet rounding Beachy Head. Approaching Dover Strait. c.20–30 miles from French coast. |
Final preparations at Dives. |
Burning and raiding Yorkshire coast. |
| 12 Sept |
Low 2 at or near peak. NW winds on French coast. SE winds on English coast. |
Fleet in Strait or Thames approaches. Storm damage and losses. ‘Many perished ere they came thither.’ (ASC-C — single source) |
William departs Dives. ‘Driven by the breath of the west wind to moorings at Saint-Valéry.’ (William of Poitiers — single source) Supply ships wrecked on Alabaster Coast. c.83 ships lost. |
Norse fleet burning Scarborough c.16 Sept. Moving south. |
| c.13–17 Sept |
Low 2 clearing. High still in place. |
Battered fleet arrives London. |
Survivors reach St Valérie. Casualties concealed and buried in secret. Emergency resupply begins. |
c.18 Sept — fleet beaches at Riccall, 8 miles south of York. (Orderic Vitalis) |
| 20 Sept |
Block still in place. Contrary winds at St Valérie. |
Harold rides north. |
Waiting at St Valérie. |
Battle of Fulford. Hardrada and Tostig defeat earls Edwin and Morcar. (ASC-C, ASC-D) |
| 25 Sept |
Block breaking down. Wind beginning to shift. |
Battle of Stamford Bridge. Harold defeats and kills Hardrada. (ASC-C/D/E) Only 24 ships needed to carry Norse survivors home. |
Still waiting at St Valérie. |
Hardrada and Tostig killed. |
| 27–28 Sept |
Omega block collapsed. High displaced NE toward Denmark. Light southerly develops at St Valérie. |
Hears of William’s landing. Begins movement south. |
Wind shifts southerly. Fleet crosses overnight. Lands at Pevensey 28 September. (William of Poitiers; universally confirmed) |
Norse survivors sail home to Norway. |
| 14 Oct |
— |
Battle of Hastings. |
| | |
|---|
Implications ▲ |
|---|
|
If the same low pressure system struck both fleets simultaneously in mid-September 1066,
several previously puzzling aspects of the campaign fall into place:
Why Harold stood down his fleet on 8 September. The decision has often been
criticised as premature. But if a major storm was already building in the western Channel,
Harold's commanders may have had good reason to get the fleet moving before conditions
deteriorated further. The timing was not poor judgement — it was a race against the weather
that was nearly won.
Why William's wait at St Valerie was so prolonged. The received explanation
is that William was simply waiting for a southerly wind. But as page D argues, he was also
waiting for replacement supplies — the lost ships were predominantly the non-oared transport
and supply vessels. The storm that drove him to St Valerie left him with most of his army
but insufficient food and fodder for an invasion. He needed both the wind and the supplies
before he could sail.
Why the two fleets never met in the Strait. Harold's fleet was in the Strait
of Dover on approximately 10 to 12 September — the closest point of approach between England
and France, the natural interception point for any blocking action. William was still at Dives.
Had Harold known, or had the weather been different, the two fleets might have met there.
Instead, Harold's fleet was driven through the Strait by the building storm, and William left
Dives into that same storm two days later — the two forces passing each other's position
separated by a day and 25 miles of open water.
Why neither side recorded the connection. Norman chroniclers were writing
about William's campaign. Saxon chroniclers were writing about Harold's. Neither had reason —
or possibly knowledge — to connect the two sets of losses. The Norman sources actively suppressed
the storm damage. The connection between the two events has therefore remained invisible for
nearly a thousand years, simply because nobody was reading both sets of sources simultaneously
and asking whether the weather linking them was the same weather.
| | |
|---|
Conclusion ▲ |
|---|
|
The meteorological, geographical and chronological evidence is consistent with a single Omega block sitting over the British Isles and adjacent seas through August and September 1066 — and every major naval event of the campaign traces back to it.
Low 1 gave Hardrada following winds the length of his voyage, from Norway to Shetland to the Humber, producing the fast, decisive passage that let him strike Yorkshire while England's attention was fixed on the Channel.
The trapped high in between denied William any such advantage — funnelling a procession of Atlantic lows along the Channel corridor and holding his fleet at Dives for weeks. And when that same pattern finally produced Low 2 in the Strait, it struck Harold's and William's fleets simultaneously from opposite sides of the same 25 miles of water, wrecking Norman supply ships on the Alabaster Coast and driving Harold's fleet onto a lee shore in the Thames approaches.
Three fleets. Three different outcomes. One weather system.
The storm did not simply delay William, or simply damage Harold. It shaped the entire sequence of the campaign — giving Hardrada his opening in the north, trapping William in the south for weeks, then striking both English and Norman fleets from the same rotating low before finally collapsing to hand William his crossing. The Viking invasion, the Norman delay, and the Saxon and Norman naval losses were not three separate stories that happened to overlap in September 1066. They were three faces of the same atmospheric event — and its final collapse on 27 September set in motion the sequence that ended at Hastings on 14 October.
| | |
|---|
Bibliography ▲ |
|---|
|
Primary Sources
- Anglo-Saxon Chronicle — multiple manuscript versions, see
page 1, Anglo Saxon Chronicles
- William of Poitiers, Gesta Guillelmi — the only contemporary Norman account of
the storm between Dives and St Valerie
- Master Wace, Roman de Rou — ship count at St Valerie (694 ships)
Secondary Sources
|
|
|
;)
)