| The Battle of Jengland 851AD: A Prelude to Hastings? |
|---|
| |
|---|
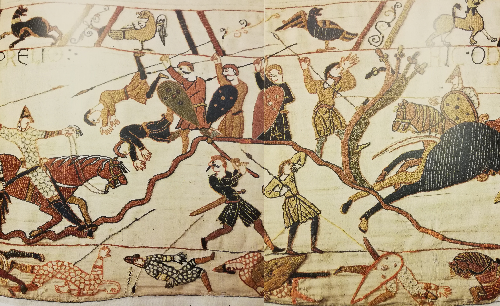
The Battle between the Bretons and Charles the Bald of the Franks |
|---|
This is an extract from the Wikipedia article
In August 851AD, Charles left Maine to enter Brittany by the Roman road from Nantes to Corseul. The king arranged his troops in two lines:
at the rear were the Franks;
in front were Saxon mercenaries whose role was to break the assault of the Breton cavalry, which was known for its mobility and tenacity.
In the initial engagement, a javelin assault forced Saxons to retreat behind the more heavily armoured Frankish line. The Franks were taken by surprise. Rather than engage in a melée, the Bretons harassed the heavily armed Franks from a distance, in a manner comparable to Parthian tactics, but with javelins rather than archers. They alternated furious charges, feints, and sudden withdrawals, drawing out the Franks and encircling over-extended groups.
After two days of this sort of fighting, Frankish losses in men and horses were mounting to catastrophic levels, while the Bretons suffered few casualties. With his force disintegrating, Charles withdrew from the field during the night. When his disappearance was noticed the following morning, panic seized the Frankish soldiers. The Bretons quickly raided the camp, taking booty and weapons and killing as many fugitives as they could.
| How could the Saxon Fyrð hold off the Bretons in 1066AD ? |
|---|
If the style of fighting the Bretons used could defeat heavily armoured troops with supporting Saxon mercenaries using Axes how could the Fyrð manage to hold back the Bretons at the Battle of Hastings ?
The Saxon Fyrð were much less well armed and armoured than Charles the Bald's troops and were much more susceptible to damage from thrown spears as their armour was predominantly leather and they were likely to have less shields.
So this begs the question how did they achive this apparent impossible task?
The Shield Wall has been used to explain the apparent effectiveness of the Saxon forces, but this was just a theoretical formation invented by historians in the 1800's to explain their views of the Battle of Hastings.
It’s a widespread misunderstanding that the Vikings stood shield by shield and created a close formation in battle with their round shields, says archaeologist Rolf Warming, director of the Society for Combat Archaeology.
For an article on the Saxon Shield Wall please follow this link, for this article please visit our Battle of Hastings - Saxon Shield Wall - did it really exist? page.
Another related article is to do with the Malfosse which gives an alternative to the Shield Wall theory, for this article please visit our Battle of Hastings AD1066 - Evidence for the Malfosse page.
Henry of Huntingdon and Master Wace both talk about a ditch during the battle, with Master Wace claiming that this was a Saxon made defence (and they had moreover made a fosse, which went across the field), this is a possibility if the Normans broke through the Shield Wall and hence into the Saxon lines, but were then pushed back into the ditch(fosse) great losses would have occurred. Before the battle Master Wace also describes Saxon defences (There he said he would defend himself against whoever should seek him ; and he had the place well examined, and surrounded it by a good fosse, leaving an entrance on each of three sides, which were ordered to be all well guarded.), this potentially explains the battle ditch description.
| | |
|---|
Conclusion |
|---|
The Battle of Jengland demonstrates that Breton cavalry tactics were capable of destroying a force that was better armed, better armoured, and numerically comparable — not through superior strength but through mobility, harassment and the exploitation of broken formations. The Franks had no answer to an enemy that refused to engage on their terms.
By 1066 those same tactics had been inherited and refined by the Norman military machine through decades of border warfare with Brittany. The Breton contingent in William's army at Hastings was substantial, and Harold had seen their methods at close quarters during the 1064 Brittany campaign. He knew what was coming.
The question of how the lightly armed Saxon Fyrd — less well protected than the Frankish troops who were destroyed at Jengland — managed to hold experienced Breton cavalry for most of a day therefore has to have an answer beyond courage or a shield wall formation. Farmers with mixed weapons and no cavalry training do not simply absorb Breton-style assault tactics for eight hours in open ground.
The answer lies not in how the Saxons fought, but in what Harold built before the battle started.
For the full argument and documentary evidence see Evidence for the Malfosse
|
|
|
;)