| Harald Hardrada's Invasion 2 — The Battle of Fulford Gate — 20 September 1066 |
|---|
| Introduction — the forgotten battle that shaped the Conquest ▲ |
|---|
|
The Battle of Fulford Gate on 20 September 1066 is the least examined of the three major engagements of that extraordinary year, overshadowed by Stamford Bridge five days later and Hastings three weeks after that. Yet a strong case can be made that Fulford was the engagement that ultimately determined the outcome of the Norman Conquest. It destroyed the military strength of Yorkshire — England's largest and most populous shire — neutralised the forces of Lincolnshire and the northern midlands, exhausted Harold's elite household warriors, and stripped England's southern defence of the reinforcements that might have held William's army on the ridge near Hastings.
Understanding Fulford requires understanding not just the battle itself but the chain of events that produced it: the assembly of the Viking fleet in Norway, the coastal campaign down the Yorkshire shore, and the strategic choices made by both sides in the days between Hardrada's arrival at Tynemouth on 8 September and the clash at Fulford on the 20th. See: Harald Hardrada's Invasion — from Norway to the Yorkshire coast.
| | |
|---|
The forces available — a note on methodology ▲ |
|---|
|
The numbers presented in this page are estimates derived from Domesday Book population figures for 1086, adjusted for 1066, and from comparative analysis with the Norman invasion force examined elsewhere on this site. No contemporary source gives precise figures for the forces at Fulford, and the saga accounts are not reliable for numerical detail. The methodology used here — calculating theoretical fyrd pools at approximately 6% of the non-slave population, with approximately 60-70% of that pool mobilisable for a major crisis — produces figures that are internally consistent and comparable with what other evidence suggests about Saxon military organisation, but they should be read as informed estimates rather than established facts. The assumptions underlying these calculations are set out in a separate methodology note. See: Saxon army strength and composition
| | |
|---|
The Saxon forces — how they assembled ▲ |
|---|
|
The Saxon forces at Fulford were assembled through a warning system that has been largely overlooked in the standard accounts. The starting point was Cleveland, where Hardrada's fleet raided after landing at the Tees on approximately 8 September. A mounted messenger from Cleveland could reach York — approximately 55 miles to the south-west — within a single day riding hard. Earl Morcar of Northumbria therefore had news of the Norse fleet's arrival on the Yorkshire coast by approximately 9 September, eleven days before the battle. That warning time is critical to understanding what Morcar was able to assemble, and why what he assembled was not enough.
Upon receiving the Cleveland warning, Morcar immediately called out the Yorkshire fyrd — the shire militia system under which able-bodied men owed military service to defend their region. Based on Domesday population figures, Yorkshire could theoretically muster approximately 1,637 men from a non-slave population of around 27,000. These were not professional soldiers but farmers, craftsmen, and townspeople with basic military training and the motivation to defend their homes. Morcar also sent word immediately to his brother Edwin, Earl of Mercia, requesting urgent reinforcement. Edwin responded by marching north with approximately 1,000 men comprising his household troops — professional warriors who served the earl directly — plus select fyrd from Mercian shires close enough to respond quickly. Edwin's force arrived at York on the morning of 20 September, mere hours before the fighting began, having completed a forced march that left his men tired before the battle started.
The combined Saxon force at Fulford therefore numbered approximately 2,637 men — the Yorkshire fyrd of 1,637 and Edwin's Mercian contingent of 1,000. Its composition was heavily weighted toward militia rather than professionals. While Edwin's household troops provided a core of experienced warriors, the bulk of the force consisted of Yorkshire men fighting their first major engagement. Other northern forces had been alerted and were marching toward York — the Lincolnshire fyrd of approximately 1,581 men had begun assembling when the Viking fleet entered the Humber on approximately 16 September — but geography made their arrival before the battle impossible. Lincolnshire lay on the southern side of the Humber, a tidal estuary that could not be crossed directly. Their fyrd had to march around the estuary, a journey of approximately 75 miles that took five days on foot. They arrived at York on 23 September — three days after Fulford, in time to join Harold for Stamford Bridge but not in time to prevent the destruction of Morcar's army.
| | |
|---|
Why Harold was not present ▲ |
|---|
|
King Harold was not at Fulford, and understanding why matters for the wider narrative of 1066. The warning from the Cleveland raiding reached London via the messenger relay system on approximately 18 September — ten days after the fleet's arrival at Tynemouth and two days before the battle. Harold departed immediately with his elite household warriors, covering the 211 miles from London to York at approximately 40 miles per day for mounted troops. He arrived at York on 23 September, three days after the battle. This was not a failure of the warning system. It was a simple matter of distance. England was a large kingdom, and even with the fastest possible response a king based in London could not reach Yorkshire in fewer than five days. The two-tier defence system — local forces buying time until royal forces could arrive — was working as designed. At Fulford it was overwhelmed before help could reach it, not because it failed but because the Viking army was considerably larger and more experienced than the local forces available to resist it.
| | |
|---|
The Viking fleet and forces ▲ |
|---|
|
Hardrada's fleet that entered the Humber in mid-September comprised approximately 300 ships, recorded in both the Anglo-Saxon Chronicles and the Norse sagas. Using the same methodology applied to Duke William's Norman fleet on this site, the fleet's composition can be estimated at approximately 80% warships — snekka-type longships — and 20% transport vessels, giving roughly 240 warships and 60 transports. This high warship ratio reflects the fleet's purpose: a combat-optimised invasion force rather than a trading or colonisation expedition. Unlike the Norman fleet which required enormous transport capacity for 3,000 horses and their fodder, the Viking army fought entirely on foot.
Hardrada brought approximately 50 horses for commanders, scouts, and messengers, but his warriors needed no cavalry support. The entire transport capacity of the fleet could therefore be dedicated to fighting men and essential supplies rather than the logistics of mounted warfare. The fighting force at Fulford is estimated at approximately 6,000 warriors, with a further 2,500 support personnel — shipwrights, smiths, cooks, surgeons — giving a total expedition of around 8,500 people.
The core of the fighting force was the hird — Hardrada's elite household warriors, numbering approximately 1,200 men, many of them veterans of his campaigns in the Mediterranean as part of the Byzantine Varangian Guard. Around these professionals were arrayed the warriors of the Norwegian jarls who had joined the expedition, and the men contributed by the Orkney earls and Tostig's contingent. Against the Yorkshire fyrd and the Mercian reinforcement, Hardrada held a numerical advantage of approximately 2.3 to 1, and a qualitative advantage that the numbers alone do not convey.
| | |
|---|
The fleet anchorage — Riccall as island base ▲ |
|---|
|
The traditional account places the Viking fleet at Riccall on the west bank of the River Ouse, approximately eight miles south of York, based primarily on John of Worcester writing in the 1140s from a lost version of the Anglo-Saxon Chronicle. The Anglo-Saxon Chronicle itself says only that the Norwegians sailed their ships "up the Ouse towards York" without specifying a landing point. This placement has been accepted largely without question, but the standard accounts imagine Riccall as a simple riverbank beaching point on the modern map — which is a significantly misleading picture of what Riccall was in 1066.
The British History Online entry for Riccall is unusually precise on the local geography: the parish sits on land scarcely 25 feet above mean tide level, and much of the surrounding country would be submerged at high water were it not for the embankments constructed along both sides of the river to confine the water within the channel. Those embankments are a post-medieval feature. Without them, and at the 4-5 metre elevated sea levels established for the early Anglo-Saxon period from place-name analysis, flood modelling, and the 2026 geological research of Dr Roger Higgs, the surrounding country was not seasonally flooded but permanently inundated. Riccall in 1066 was not a point on a riverbank. It was an island — a slightly raised plateau of land surrounded by tidal water, accessible only by boat. See: Sea levels in the Anglo-Saxon period — the Pevensey evidence page
The documentary record corroborates the flood modelling with two named landscape features that the standard accounts have not connected to the 1066 campaign. A mid-fourteenth century fishery record for Riccall mentions two features by name: the Ness, belonging to the prebendary, and the Fleet, belonging to the Bishop of Durham. Ness is Old English for a headland or promontory — consistent with a raised island position projecting into surrounding water. Fleet derives from Old English fleot, meaning a tidal creek or inlet — the same term used in the place-name evidence for tidal penetration elsewhere in the elevated sea level landscape. The Fleet at Riccall is not a settlement name in the æg family, but it is a named tidal feature in the medieval documentary record that confirms tidal water penetrated the Riccall landscape in exactly the way the flood model predicts. It is the corroborating place-name evidence the flood modelling needed.
The administrative geography reinforces this picture further. Riccall parish lay in the wapentake of Ouse-and-Derwent — named jointly for both rivers, placing Riccall administratively at the junction of two navigable waterways rather than simply on one bank of one river. Immediately downstream of Riccall the Derwent meets the Ouse at Barmby on the Marsh — the name itself recording a tidal confluence in a permanently marshy landscape. From the Riccall island anchorage, vessels could sail north up the Ouse to York, or north-east up the Derwent towards Stamford Bridge. The fleet was not simply parked on a riverbank. It was positioned at a navigable junction, on a defensible island, giving Hardrada water access in multiple directions while keeping the ships protected from land-based attack. This is precisely the kind of anchorage an experienced fleet commander would choose.
The Bulmers 1892 entry for Riccall records that the fleet left at the anchorage was under the command of Olaf, Hardrada's son, and Eystein Orre his betrothed son-in-law — both senior figures whose appointment to guard the ships reflects the importance of the anchorage to the entire campaign. A Viking army that lost its fleet lost its retreat, its supplies, and its ability to manoeuvre along the river systems. Leaving it under two of the most trusted men in the expedition, on a defensible island at a navigable junction, was not incidental logistics. It was the strategic foundation on which the entire land campaign rested.
From the Riccall island anchorage the army marched north-west to engage the Saxon blocking force at Fulford on 20 September — a distance of approximately seven to eight miles. After defeating the Saxons and securing York's surrender on 21 September, Hardrada set the hostage exchange at Stamford Bridge, seven miles east of York on the River Derwent. This was not an arbitrary choice. Stamford Bridge lay directly upstream from the Riccall anchorage via the Derwent, at elevated sea levels navigable to near Kexby less than two miles from the bridge itself. The army's camp, the fleet's anchorage, and the hostage exchange point formed a coherent triangle of positions along navigable waterways — York to the north-west, Riccall to the south, Stamford Bridge to the east — that makes complete tactical sense given the river geography of 1066. When Harold marched east from York on 25 September and surprised the Vikings at Stamford Bridge, he found them at their own base, adjacent to their fleet, unprepared for battle because they were not expecting an attack at their camp. The Riccall island anchorage, and the Derwent navigability that connected it to Stamford Bridge, explains the entire northern campaign more coherently than the standard narrative of a simple riverbank beaching on the Ouse.
This reading of the Riccall anchorage as an island position at a navigable junction is the author's inference from flood modelling, the named Fleet and Ness landscape features, and the wapentake geography. It is not the current position of mainstream scholarship, which continues to treat Riccall as a straightforward riverbank location without addressing the tidal landscape evidence.
The Bulmers 1892 entry also records that bones and old iron were turned up in a field near Riccall Landing some sixty years before that date, and approximately ten human skulls were disinterred at the Old Landing in the West Fields around 1882. The British History Online entry adds that approximately 50 skeletons were found near the river in 1956-57, noted as possibly connected with the events of 1066. No osteological analysis of sex, age, or trauma is recorded for any of these finds, and without that analysis the attribution cannot be resolved. The local tradition connects them to Norse casualties fleeing back to the ships after Stamford Bridge — men cut down by Harold's pursuing army before they could reach the island anchorage. But an equally plausible explanation is that they represent the civilian population of Riccall itself, killed when Hardrada's army landed and took over the settlement as its base camp. A Viking army of potentially 9,000 men establishing a fortified island anchorage would not have left the existing settlement population in place. The presence of old iron alongside the bones is consistent with a violent event but not diagnostic of which one. A third possibility noted by Bulmers — that some remains derive from the English Civil War engagement at Selby — cannot be ruled out for the later finds. What the bones establish, whatever their origin, is that violent death occurred at or near the Riccall landing point in circumstances that have not been adequately investigated by modern archaeological methods. A targeted osteological study of any surviving remains, with radiocarbon dating and sex determination, would be of considerable value to the understanding of the 1066 campaign in this area.
| | |
|---|
Map representation of Riccall and York with the high tide raised ▲ |
|---|
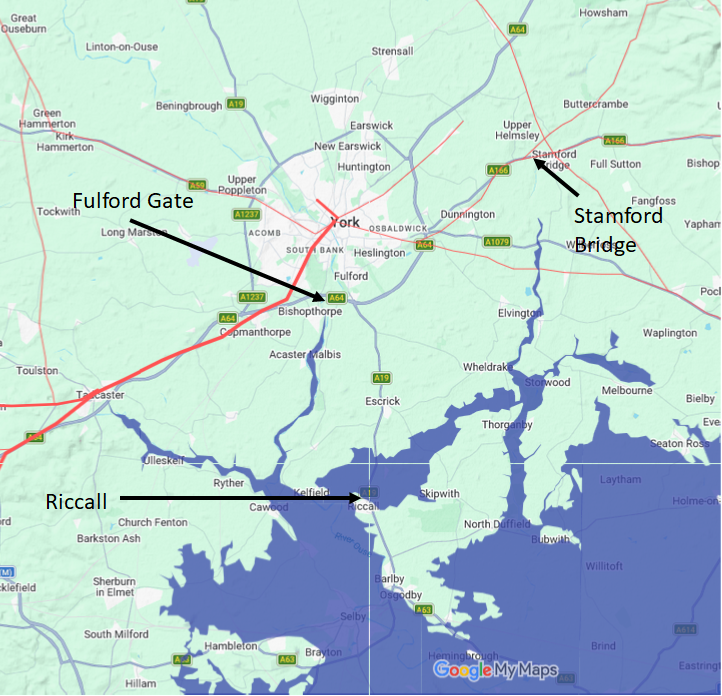
| The Battle ▲ |
|---|
|
The battle was fought on the morning of 20 September at Fulford, approximately two miles south of York, where the road from the south crossed the low-lying ground between the Rivers Ouse and Derwent. Morcar and Edwin had chosen this position deliberately — the wetlands on either flank constrained the front on which a larger force could engage them, reducing Hardrada's numerical advantage. It was a defensible position, but not defensible enough against a force of the quality and size Hardrada commanded.
Hardrada deployed his men in a disciplined infantry line — shields overlapping, spears projecting forward, the elite hird forming the strongest sections. The term shield wall, frequently applied to this formation in popular history, implies a kind of magical defensive barrier that the reality did not possess. What Hardrada commanded was organised professional infantry standing in a coherent line, which is both more ordinary and more formidable than the romanticised version suggests. Its effectiveness came from the quality and experience of the men in it, not from any special formation.
Against this formation the Saxon force fought with considerable determination. The initial stages of the battle were more even than the numbers suggest — the constrained ground and the motivation of men defending their own country compensated partially for the disparity in numbers and experience. But the Yorkshire fyrd, mostly farmers and craftsmen fighting their first major engagement, could not sustain the pressure of repeated attacks by professional warriors who had fought across Europe and the Mediterranean. The line eventually broke. Once a shield wall collapsed the casualties escalated rapidly — the fleeing men were cut down before they could reach safety, and the victorious army suffered relatively little in the pursuit.
Saxon casualties at Fulford were catastrophic. Of the approximately 2,637 men who fought, between 1,500 and 2,000 were killed or seriously wounded — a casualty rate of 60 to 75%. The Yorkshire fyrd suffered disproportionately, losing perhaps 1,200 of their original 1,637. Edwin's more professional Mercian contingent took severe losses but in smaller proportion. Approximately 837 men survived to retreat to York. Both earls survived, but their forces as coherent military units had effectively ceased to exist. Viking casualties by contrast were relatively light — perhaps 350 men out of 6,000 — reflecting the decisive nature of their victory and the dynamics of a battle in which the losing side broke and ran. The road to York lay open. The city surrendered the following day.
| | |
|---|
Why Morcar and Edwin chose to fight ▲ |
|---|
|
The decision of Edwin and Morcar to advance and engage Hardrada rather than fall back behind York's walls has puzzled some historians. With a garrison behind defensible walls they could have held York long enough for Harold to arrive. Instead they marched out to fight in the open and were destroyed. The decision reflects several pressures that the standard narrative underestimates.
First, York in 1066 was a large and prosperous city with a substantial civilian population. Allowing a Norse army of 9,000 to 15,000 men to surround and besiege it would have exposed that population to the full consequences of a medieval siege — starvation, assault, the destruction of property. Morcar had a responsibility to the people of his earldom that went beyond simple military calculation.
Second, if the Heslerton identification of Hellornes is correct, a force sent south-east to block the York road had already encountered Norse scouts or a foraging party and been pushed back. [See: Harald Hardrada's Invasion — from Norway to the Yorkshire coast] That engagement, if it occurred, would have told Morcar that Hardrada was already probing the overland approaches to York and that the city could not simply wait behind its walls while the Norse army established itself in the surrounding countryside.
Third, Edwin arrived on the morning of the battle with approximately 1,000 men. The combined force of 2,637, while outnumbered, was not negligible. With the constrained ground at Fulford providing some compensation for the numerical disadvantage, a commander with two of England's most powerful earls at the head of a motivated defensive force might reasonably have judged the odds acceptable. The Vikings had just burned Scarborough and ravaged the Yorkshire coast. The men of the fyrd knew what defeat would mean for their families and their farms. Morcar and Edwin chose to fight because fighting was not an obviously wrong decision given what they knew at the time.
| | |
|---|
The aftermath — consequences for Stamford Bridge and Hastings ▲ |
|---|
|
The destruction of the Yorkshire fyrd at Fulford had consequences that extended far beyond the battle itself and far beyond Yorkshire. When Harold assembled his army for the counterattack at Stamford Bridge on 25 September, his force of approximately 4,961 men had a very different composition from what it might have been. It included his 1,000 household warriors, the Lincolnshire fyrd of 1,581 men who had missed Fulford entirely and joined Harold on his march north, approximately 1,343 men from other northern counties who had been assembling in response to the invasion, and only 837 survivors from Fulford itself — barely a third of Morcar's original force, exhausted and demoralised. The professional core of approximately 1,100 household warriors gave Harold the quality to win at Stamford Bridge, but at significant cost. Harold's household troops were reduced from approximately 1,000 to 700-800 by the fighting. Edwin's surviving household warriors numbered perhaps 30 to 50.
When William landed at Pevensey on 28 September — three days after Stamford Bridge — Harold faced the strategic problem that Fulford had created and Stamford Bridge had deepened. The Yorkshire fyrd was gone. The Lincolnshire fyrd, which had fought at Stamford Bridge, was too exhausted to march south again in time. The fyrd of Nottinghamshire, Derbyshire, Cheshire, and Staffordshire, which had been marching toward York, was scattered across the north. The northern shires that together could have contributed another 3,000 to 4,000 men to the Hastings army were absent — their forces either destroyed at Fulford, depleted at Stamford Bridge, or too far away to concentrate in time. Harold marched south with what he had. It was not enough.
The Battle of Fulford, fought on 20 September 1066 by two English earls making a defensible military decision with the forces available to them, may have been the engagement that made the Norman Conquest possible. By destroying the Yorkshire fyrd and drawing in the forces of Lincolnshire and the northern midlands, Hardrada's invasion — though it ultimately failed — prevented Harold from assembling England's full military strength against William. Fulford is where that possibility was foreclosed. [See: The Battle of Stamford Bridge] See: The Battle of Hastings — forces available to Harold
| | |
|---|
A note on the sources ▲ |
|---|
|
The primary sources for Fulford are thin and inconsistent. The Anglo-Saxon Chronicle manuscripts C, D, and E all refer to the battle but in summary terms without tactical detail. The Heimskringla of Snorri Sturluson, compiled around 1225, provides the most narrative detail but is a thirteenth century saga source working from oral tradition and earlier skaldic poetry rather than contemporary record. John of Worcester provides dates and some geographical information.
Orderic Vitalis, writing approximately 60 years after the battle, provides the Riccall fleet anchorage detail that has been questioned in this page. Florence of Worcester's account broadly corroborates the Chronicle but adds little tactical detail. For the numbers presented in this page — fyrd sizes, fleet composition, casualty estimates — no contemporary source provides reliable figures, and all numbers should be understood as methodology-derived estimates subject to revision as further evidence emerges.
A note on terminology: this page uses the term shield line rather than shield wall throughout. Shield wall has become a romanticised concept in popular history, implying a near-impenetrable defensive formation with almost mystical properties. The sources describe nothing more — or less — than organised infantry standing in a coherent line with overlapping shields, a formation used by virtually every culture that fought on foot. Its effectiveness at Fulford, at Stamford Bridge, and at Hastings depended entirely on the quality, training, and morale of the men in it. Replacing shield wall with shield line is an attempt to recover the ordinary military reality from beneath the mythology.
| | |
|---|
References and sources ▲ |
|---|
|
Anglo-Saxon Chronicle, manuscripts C, D and E
Snorri Sturluson, Heimskringla — Saga of Harald Hardrade (compiled c.1225; Project Gutenberg EBook #598)
John of Worcester, Chronicle
Orderic Vitalis, Historia Ecclesiastica
Florence of Worcester, Chronicon ex Chronicis
DeVries, K. The Norwegian Invasion of England in 1066 (Boydell Press, 1999)
Higham, N.J. The Kingdom of Northumbria AD 350-1100 (Sutton Publishing, 1993)
Higgs, R. English Coastal Archaeological Evidence of a Fifth-Century (Dark Ages) 4-Meter Sea-Level Rise in 70 Years, Journal of Coastal Research 42(1) (2026)
saxonhistory.co.uk — Sea levels in the Anglo-Saxon period — the Pevensey evidence [See: Pevensey islands theory]
saxonhistory.co.uk — The Humber estuary at 1086 [See: Domesday Humber estuary page]
saxonhistory.co.uk — Harald Hardrada's Invasion — from Norway to the Yorkshire coast
saxonhistory.co.uk — The September Storm — both fleets, one weather system
saxonhistory.co.uk — Saxon army strength and composition [See: Forces available to Harold]
|
|
|
;)