| Battle of Hastings 1066AD - V - The Battle |
|---|
| The Battle of Hastings 1066AD |
|---|
| Introduction ▲ |
|---|
How did an army of Saxon farmers hold off the elite knights of Normandy for an entire day? The conventional answer — a disciplined shield wall of interlocking shields — doesn't survive serious scrutiny. A line of farm labourers holding handheld shields cannot withstand hours of crossbow fire, javelin charges and cavalry assaults. Something else was keeping the Normans out.
This page presents a step-by-step reconstruction of the Battle of Hastings built on a different premise: that Harold's army did not stand in the open behind shields, but behind a chest-high wattle fence fronted by a dug ditch studded with sharpened stakes — a field fortification the Saxons had the tools, the manpower and the time to build before the battle began. The reconstruction works through seven phases of the battle from the Norman opening barrage to Harold's death in the late afternoon, showing how each episode recorded in the chronicles maps logically onto this model.
It doesn't claim to be the definitive account. It claims to be the most coherent one.
| | |
|---|
Combat Details ▲ |
|---|
|
To understand the Battle of Hastings it helps to approach it as two commanders who had both done their intelligence work and built specific tactical plans against each other's known capabilities.
William's plan was built around three weapons. His Breton cavalry could destroy lightly armed infantry in open ground using the feint-and-encircle tactics that had destroyed the Franks at Jengland in 851. His crossbowmen, recruited specifically from the former Byzantine territories of Apulia, Calabria and Sicily, could punch quarrels through ring mail at close range — killing the huscarls that conventional weapons could not reliably reach. His handbowmen could sustain a missile barrage across the whole Saxon line to attrit and demoralise while the cavalry and crossbows did their specific work.
Harold's counter was built around a single structure: a ditch, a spoil bank, and a wattle fence across the front of his position. The ditch stopped cavalry momentum and made the Breton feint-and-encircle impossible to execute safely. The wattle and bank kept the crossbowmen further back than their effective killing range against ring mail. The uphill position and fence together made direct handbow fire largely ineffective, forcing the Normans to resort to plunging overhead shots that were less accurate and less powerful.
For most of the day Harold's counter worked. The battle was lost not because his fortification failed but because his own men broke it — fyrd soldiers who could not resist pursuing what looked like a beaten enemy, leaving gaps in the line that the Norman cavalry finally exploited. The Breton tactic that had destroyed the Franks at Jengland two centuries earlier worked in the end — not against the fosse, but against the men who abandoned it.
| | |
|---|
Summary ▲ |
|---|
The Battle of Hastings was fought on 14 October 1066 near Hastings in East Sussex between the English army of King Harold II and the invading Norman forces led by William, Duke of Normandy. The conflict arose after the death of Edward the Confessor in January 1066, which left the English throne disputed. Harold was crowned king, but William claimed that Edward had previously promised him the crown and launched an invasion to press his claim.
Harold’s army had recently fought and defeated the Norwegian king Harald Hardrada at the Battle of Stamford Bridge before marching rapidly south to meet William’s landing. At Hastings, the English forces formed a defensive shield wall on high ground, while the Normans deployed archers, infantry, and cavalry. Repeated Norman assaults, including feigned retreats, gradually weakened the English line. During the fighting Harold was killed, and the English army collapsed.
William advanced toward London and was crowned king on 25 December 1066. The battle marked the beginning of the Norman Conquest of England and the end of Anglo-Saxon rule in England, leading to significant political, social, and cultural change.
| My Introduction ▲ |
|---|
Many years ago I used to be an Analytical Chemist, and over time I became a computer systems engineer and programmer. So not very interesting so far, it just shows I like logic. Then I retired and because I live in Battle in Sussex I joined Battle Museum as a volunteer, where there is an artifact, an axe head that dates to the Battle of Hastings period. So I started to investigate the Battle, and find out what evidence we have for the Battle being here.
But how did a largely unmounted, unarmored English army hold off the elite knights of Normandy for an entire day?
| The Scenario ▲ |
|---|
So looking at the troops that were at Hastings, it seems that the majority of the Norman troops were either knights with horses and their retainers or were mercenaries, so mostly fairly heavily armed. "They also had crossbows — for details of these see the Bows and Crossbows page."
The Saxons on the other hand had the Huscarls, the professional soldiers of the King and Earls, of which its believed there were about one thousand again very heavily armed and shielded. The remainder of the troops were the Fyrd (actually spelt Fyrð and pronounced fyrth) was the local militia from the Saxon shires in which all freemen had to serve when requested. The Thanes in charge of the troops were probably on horseback and had swords, shields and helmets, the remained of the Fyrð were probably armed with spears, possibly shields and maybe leather armour.
So we have a relatively unprotected Saxon force fighting a much more heavily armed and armoured mobile Norman force, hence we need this magical 'Shield Wall' to defend the Saxon Fyrd or they will be massacred very quickly.
| An alternative to the currently accepted story ▲ |
|---|
Or do we ?? - Imagine this: Instead of a thin line of men, the English army is standing behind a chest-high wattle fence. In front of that fence is a steep bank, and in front of that bank is a ditch, studded with sharpened stakes. The Normans do not charge a line of men; they charge an obstacle course.
This is the central idea of my reconstruction. It explains why the Norman cavalry could not break the English line for hours, why the Malfosse became a death trap, and how the English farmers—the Fyrd—could stand against professional soldiers. It turns the traditional "shield wall" on its head.
The following pages build the case for this model, step by step, using the chronicles and the logic of the ground
itself.
| 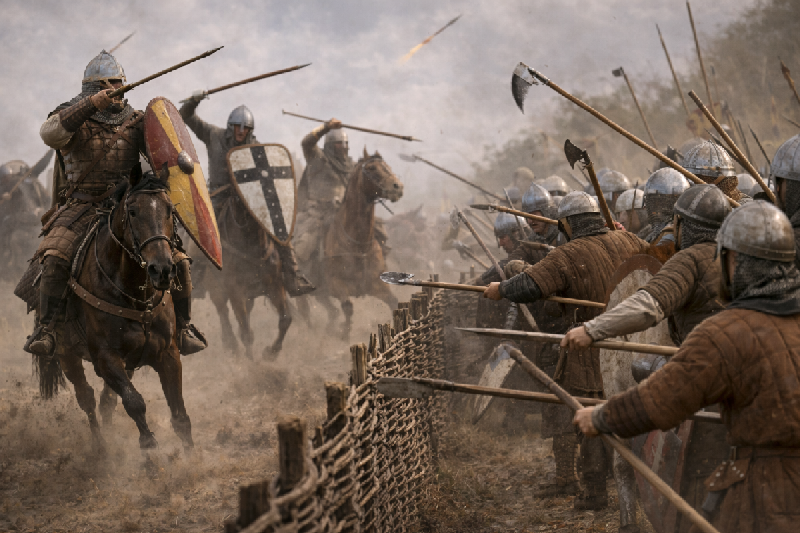
Norman Knights attacking the Saxon Shield Wall, closest I could get to my concept using ChatGPT
| Time of the Battle ▲ |
|---|
Please be aware that sunrise sunset times vary across every location in the world due to latitude and longitude changes.
Now we can get the modern sunrise/sunset times for Bexhill as this seems to be the probable location of the Norman camp, but varies only by a minute or two for the surrounding area.
The battle is recorded as being on the 14th October 1066AD
However due to the change of the calendars from Julian to Gregorian which skipped in Britain from September 2nd 1752 with the next day being the 14th September - a difference of 11 days between calendars
This would mean that the 14th October using the Julian date would refer to the 25th October in modern times.
So for the 25th October the sunrise/sunset times are 06:48 -> 16:54 (I have used GMT(Greenwich mean time) as our base times just to show relative times) this is taken from Time and Date.com.
However there is light before sunrise and after sunset and at this time of year is about 34 minutes so this would mean that there would have been limited light from about 06:14 , with sunrise at 06:48 to sunset at 16:54 and limited light until about 17:28(using GMT)
Orderic Vitalis writes:
So the Battle raged from the third hour and Harold the King was killed in the first assault.(this time of Harold's death conflicts with other Chronicles)
Let us try to interpret this
So from the third hour might mean after the third and before the fourth hour, and this could be taken from first light or actual sunrise.
This gives us a range of times:
- Minimum possible time, if using first light 06:14 and exactly 3 hours this would mean that the battle started at 09:15. (In my opinion this is very unlikely due to early food and preparing to march)
- Maximum time if using actual sunrise 06:48 and less than four hours so add 3 hours 59 minutes this would mean that the battle would start at about 10:47.
- Let us assume therefore that the possible start of the Battle was sometime between 09:15 and 10:47(GMT), and ended at the end of the day so let us assume prior to sunset at about 16:00.
This was one of the longest battles recorded in Saxon times, about 7 hours.
| Timeline of the Battle ▲ |
|---|
The following is my timeline for the Battle of Hastings 1066AD
| Prior to the Battle ▲ |
|---|
- Saxon farmers (greater Fyrd) create a wattle fence across the battlefield and round both sides of the Saxon lines.
- Saxon farmers (greater Fyrd) now dig a ditch about 1.5 metres from the wattle and throw the soil back against the wattle hence creating a ditch and soil embankment that the Saxons can hide behind, shields are incorporated into the top of the wattle to provide further defense.
- Saxon farmers (greater Fyrd) now cut stakes and plant them in the ditch to provide extra defense especially against horsemen.
For analysis of the Bayeux Tapestry evidence for these anti-cavalry stakes, see our Observations - Caltrops page.
| Phase I – Initial Deployment (Morning) ▲ |
|---|
- English shield wall forms atop a Hill (atop a hill at a place one chronicle calls Senlac), hidden behind the wattle fence and soil embankment in front of a dug out ditch (possibly called the Malfosse).
- Housecarls and fyrd stand concealed, shields ready, with spears/billhooks poised over the fence.
- Norman army assembles at the base of the slope.
| Phase II – Opening Engagement ▲ |
|---|
- Sometime between 09:15 and 10:47(GMT) the Normans start firing
- Norman crossbowmen fire volleys directly at the shield wall and splinter shields,
but soon run out of limited ammunition.
- Norman archers fire uphill; most arrows blocked by wattle + shields.
These are mostly low or aimed shots; ineffective against the prepared defensive line.
- Taillefer rides ahead of the Norman army, singing, performing daring feats, and killing an English scout or soldier.
Normans rally behind him and begin the initial push toward the Saxon defensive works.
- Norman infantry and cavalry advance into the ditch and wattle line.
- Saxons strike over the wattle with spears and billhooks; spiked ditch and caltrops slows cavalry.
- Early Norman casualties occur in the Malfosse.
- At this point, William realizes direct assault uphill into the wattle/ditch is failing.
The opening Norman movement is better understood as a controlled advance to effective firing positions than as a frontal assault. William's missile arm had two distinct effective ranges — the handbowmen at approximately 180 metres and the crossbowmen at approximately 120 metres — and neither could do useful work until those distances were achieved against a defended uphill position. The initial advance was sequenced accordingly.
The handbowmen moved forward first, establishing their range and beginning fire against the Saxon fence line. Their job at this stage was not to break the wall but to keep heads down and suppress movement behind the wattle while the rest of the army closed the distance. Behind them the crossbowmen advanced toward their closer threshold, where their quarrels would have sufficient energy to penetrate ring mail. The infantry followed, not yet assaulting but closing the gap between the Norman line and the Saxon fence, keeping pressure on the defenders and preventing them from interfering with the advancing missile troops.
Taillefer's famous ride fits this phase naturally. A man singing and performing feats of arms in front of a slow controlled advance makes sense as distraction and morale performance during a deliberate measured approach. It would be unnecessary and tactically disruptive at the start of a cavalry charge.
The Carmen's description supports this reading directly — archers sent before the infantry to start the battle, crossbowmen placed in the centre. This is a sequenced advance to firing positions, not a charge. The assault came later, once the missile phase had been given its chance to work.
What William discovered during this phase was that the missile phase was not working as planned. The handbowmen found their arrows blocked by the wattle fence and shields. The crossbowmen found the fosse kept them further from the Saxon line than their effective killing range against ring mail. The infantry, pressing forward to close the gap, ran into the ditch, the stakes, and the spears and billhooks of the fyrd working over the fence line from above.
At this point William faced a choice. His technological surprise — the crossbow as huscarl-killer — had been neutralised by Harold's earthwork before it could be brought to bear. The opening phase had failed to achieve its objective. Everything that followed was improvisation.
| Phase III – Breton/Norman Rout ▲ |
|---|
- William sends in the Bretons and Norman infantry
- Under heavy resistance the left wing Bretons/Norman units break formation and appear to rout .
- Panic threatens wider Norman cohesion.
- William lifts his helmet, showing his face to rally troops. Cohesion restored.
- Some of the untrained Saxon Fyrd follow up believing they have won, but are cut down by the Norman Cavalry.
| Phase IV – Norman Breakthrough ▲ |
|---|
- Renewed, coordinated Norman assaults manage to break through part of the Saxon defensive line at the wattle/ditch.
- A wedge of Norman infantry manage to get over part of the embankment — Saxons temporarily lose control of that segment.
| Phase V – Saxon Counter-Push the Normans into the fosse ▲ |
|---|
- Saxons quickly regroup, pushing forward from their positions behind the wattle.
- Using spears, billhooks, and pushing as per a rugby scrum, the weight of numbers forces the Normans back into the ditch.
- Norman cavalry and infantry trapped in the ditch take heavy casualties (hence Malfosse) — fits Wace and Huntingdon narratives
.
| Phase VI – Repeated Repulses and Attritional Pursuit Losses ▲ |
|---|
|
What the chronicles describe as feigned retreats are better understood as a repeated pattern of Norman attacks being repulsed and the attacking force withdrawing under pressure. Each withdrawal drew some fyrd men out from behind the fence in pursuit. Each time, Norman cavalry cut them down in the open before they could return to the line. This was not a planned stratagem — it was the natural consequence of attacking a defended position repeatedly, being thrown back repeatedly, and having cavalry available to exploit the disorder created each time the defenders broke cover. The cumulative effect was what mattered: each episode of pursuit cost the Saxon line men it could not replace.
| | |
|---|
Phase VII – Final Breakthrough and Harold’s Death ▲ |
|---|
- Shield wall finally weakened by repeated attacks and attritional losses.
- Close combat around Harold’s standard as he retreats uphill.
- Harold is killed in melee by multiple knights probably about 16:00(GMT).
- Shield wall collapses; English line begins disintegration.
- Battle over - Saxons rout
- The Normans pursue but the weight of Saxon troops breaks bridge over a major river crossing, hence isolating the pursuers from the early escapers, and Saxons on the Norman side of the river are destroyed.
- William tells his troops to stop pursuing.
| Key Tactical Notes ▲ |
|---|
Historical analogies, such as the Bretons at Jengland, suggest that mounted spear attacks were effective against lines of heavy infantry. The Bayeux Tapestry similarly depicts Norman cavalry charging Saxon positions, lancing or throwing spears. In this functional model of Hastings, these attacks are mitigated by physical barriers — ditch, bank, wattled fence, and shields — which slow horses and provide defenders with protection and leverage. This suggests that the Saxon defensive system relied not solely on manpower but on engineered fortifications to resist otherwise effective cavalry assaults
-
Including the Norman breakthrough followed by the Saxon counter-push demonstrates the defensive efficacy of the wattle + soil + ditch.
- Terrain allows Saxons to recover local initiative even after partial penetration.
- Malfosse acts as both defensive obstacle and counterattack trap, creating dual phases of disruption.
| Queries ? ▲ |
|---|
Bruce a friend of mine interested in the Battle (click here for his battleofhastings.info site) said to me 'There is no evidence that the Saxon Armies carried spades' so therefore the ditch digging was unlikely.
So on to the research: Battle of Hastings 1066AD Observations - 8 Wooden Spades at the Battle of Hastings
| Disclaimer ▲ |
|---|
The Battle of Hastings was fought on 14th October 1066 between the English army of King Harold II and the invading Norman forces of William, Duke of Normandy. It was one of the longest battles recorded in Saxon times, lasting approximately seven hours, and ended with Harold's death and the collapse of the English army.
The central question this page addresses is not who won, but how an largely unmounted and lightly armoured English force held off the elite knights of Normandy for an entire day. The conventional answer — a shield wall of men — does not adequately explain the chronicles or the tactical reality. A heavily armoured Norman cavalry force charging uphill into a line of farmers should have broken through within the first hour.
This page proposes a different model. The English defensive position was not simply a line of men but an engineered fortification — a wattle fence mounted with shields, a soil embankment behind it, and a staked ditch in front. The Fyrd did not stand in the open absorbing cavalry charges; they stood behind a barrier that stopped horses, deflected arrows and gave spearmen leverage over mounted attackers. The Malfosse was not an accident of the retreat but a feature of this defensive system, used and reused throughout the day.
This reconstruction is based on the chronicle evidence, the tactical logic of the ground, and the behaviour of both armies as recorded by contemporaries. It is presented as a functional model — logically consistent and consistent with the sources — not as established fact.
|
|
|
|
;)
)